Sunday, October 11, 2020

Winter Cover Crop: Fall Rye

The idea behind the winter cover crop is to keep the soil from being exposed to the elements during winter.  Eaton Rapids Joe says it better: “One reason to plan a cover crop over the winter is so your nutrients don't leach downward out of the root zone.”  It is also great for building up the humus – organic matter in the soil.  Constant nitrogen inputs, organic feed meals, hotter manures, or otherwise, will deplete your humus content as the microbes consume it when breaking down the fertilizers.

I found that out the hard way when I used to move / rotate my chicken run into each bed during the winter.  I wasn’t adding organic matter to the hot manure, even though it was scratched in by the birds and naturally sheet composted in the soil.  Gradually my soil got gummier and stickier as humus and tilth degraded.

One way to improve my humus content was to plant a fibrous rooted plant like Rye in the fall.  Both Eliot Coleman and Steve Solomon lean towards other cover crops and ‘green manures’ preferring legumes like vetches, clovers, field peas and the like.  They prefer ones that are killed with the frost and so don’t produce weed seeds and are easy to till in in the spring.  Both deem rye as too hard to work with in the spring (it can grow quickly) --- better for agribusiness and its machinery they say.

But I’ve had good success with Fall Rye.  It gets planted in most beds after their crop has been harvested.  The secret is to cover it with black plastic in the spring, a month or more before needing to work the bed.  This covering stunts or even kills the rye plants and still leaves a good supply of fine rootlets in the soil.  

The plastic cover also keeps the soil dryer during our very wet Pacific North West spring so I can pull off the plastic, trim the edges for weeds and till.  No need to wait for 3 or more dry days before working the soil.

My son TOG likes to stir in all the residual organic matter but I still like to shake out by hand the remaining plants in the spring so they don’t foul my little tiller.  This still leaves a lot of mostly decomposed organic matter in the soil.  My tilth has been improving these last 5 years without chickens.  But now with two new birds acquired for this Covid emergency, I’ll be more considerate in adding additional organic matter into their run as well as the fall rye they get to eat and dig up.

Several years ago, I bought a big sack of rye seed from Otter Co-op to last a number of years.  Alas, the second year it grew bugs instead.  I left the grain in its original sack in the garage and the moths and their worms went for it.  Smart bugs, they ate the germs – the nutritious plant growing part -- and left the rest of the seed grain.  I tried planting that the third year but nothing came up.  

So I bought another sack – it’s so much cheaper per pound than buying smaller quantities.  This time I stored it in a large plastic pail with a tight lid but also added a secret weapon: cinnamon sticks.  And boy did that work.  


No moths or worms or clumpy webs in the rye seed.  This year my two year old seed came up splendidly.  (cinnamon sticks also work great for keeping the bugs out of larger stored quantities of walnuts, oatmeal, organic whole grain flours and the like.)

I experimented with seeding 1 lb per 50 square feet verses ¾ lb.  Also tried the usual raking the seed in verses lightly covering it with screened soil.  Not too much difference so it is now to be ¾ lb per 50 square feet, raked in.  (I may try ½ lb in another later bed)

First, I raked the beds flat and kept the surface stone free so I may mow it with my lawn mower if need be.  Next, I broadcast seeded each bed, always sprinkling seed sparingly at first so I didn’t run out of seed prematurely and then went back and filled in any sparse spots.  Then I gently raked / scuffled the bed with the teeth of my bow rake.  Finally, I covered each bed with my fencing wire pieces so the neighbourhood cats wouldn’t scratch it all up.

The rye came up like weeds in the good weather.  It is now tall enough for me to cut some each day for the chickens – they love it.  Great for making bright yellow-orange yolks too.  Now I need to remove the wire fence sections and hang them up on the back board fence for storage.


A lot of the rye won’t be needing much turning in with the birds rotating through most of the rye beds before spring.  Once they’re moved out of a pair of beds, I’ll either reseed or cover with a piece of black plastic.  

Soon I’ll start to rake leaves in my neighbourhood and I’ll chop up some with the lawnmower to add to the bird’s run.  That should blend well with their droppings, adding some gentle carbon to help build up the humus levels. 

Happy Gardening.

Saturday, October 3, 2020

A Favourite Tool: My # 1 Shovel

 I was once called up to volunteer at our kid’s school’s Saturday work bee.  “Bring a shovel.” was the suggestion.  I brought mine and all the guys just stared.  They had never seen that shiny a shovel before.  And it wasn’t made of stainless steel either.

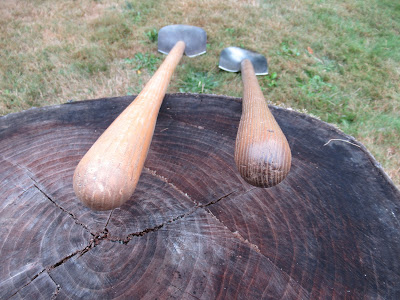
This isn’t that shovel.  It died.  This was my number two shovel that graduated to number one when the first one died of metal fatigue.  Actually, I owned this one before the other one, it just went to second status later in life.  And now it’s first again…..confused yet?  The other one was shinier.


You can see by its scars and welds that like me it has had a full life.  The bubble etched marks are from the welding of my Lovely Wife’s Brother when I broke the shank off about 40 years ago.  The fine weld in mid blade is from a skilled friend who remedied my concern over a crack that was appearing three years ago.

The shininess comes from always rinsing and wiping the blade immediately after use.  The need for shininess / smoothness is so the soil slides off even if it is damp.  Nothing sticks better than dirt to a rusty shovel.  So don’t let it get rusty.  And don’t leave it outside.  In our wet climate, weather also eats a wooden handle in a few years.

The best way to keep your number one shovel in peak condition (besides washing and storing inside) is to have a number two shovel.  My number two is owned by my Lovely Wife.  And it’s heavier and stronger than my number one.  My number one is light and used for moving soil around, turning over beds, trimming grass edges on beds and shaking out weeds and sod chunks.  


The number two is for going where no shovel has gone before --- digging virgin beds or digging out stumps.  Roots and rocks are what kill a shovel and a heavier one is best for those.  Like these two brand new beds that the chickens were in first and now I’ve discovered how far the dead cherry tree’s roots really went.


I picked up the blade of the number two from a fellow who had left it outside (as most people do) and the handle quickly aged and broke.  It had one of those short little ‘D’ handles that work really well if you’re four feet tall (Munchkins in Oz).  I had a nice new long handle waiting for it and bought a couple of rivets for it and installed it myself.

When shopping for a shovel, make sure the grain of the wooden handle is perpendicular to the blade.  That goes for axes, hatchets, hoes, rakes, hammers, canoe paddles, baseball bats, ,…. pretty much everything.  The force has to go with the grain.  If your shovel handle’s grain is parallel with the blade you’ll break it with one good pull back against a hidden rock or root.


Also, if shopping, don’t buy a shovel that is embossed with a name brand sticking out of the metal (dirt sticks to it) and never get a shovel with a ‘hammered’ finish (dirt again).  As for those composite handles – I don’t’ really know how they stand up.  They’re possibly heavier and definitely thicker to handle.  I prefer a more slender handle that I can get my fingers around, that also has a taper that I can sense where the end is without looking and so can maneuver it more easily.

My son TOG once bought a stainless-steel shovel.  He didn’t always have time to wash his shovel to keep it clean and rust free smooth.  Alas, that stainless one was curved from side to side like a normal shovel, but it also was slightly curved from front to back as well.  Every time he pushed it in it wanted to curve itself out.  Very frustrating.  He did eventually find a use for it but it wasn’t for digging or trimming soil along the paths.

Shovels vary in weight and a heavy, dirty shovel will build your muscles.   You’re constantly trying to toss the same soil that sticks to the shovel.  My number one shovel is one pound lighter than my number two. Sharpening my spade is a rare thing for me since it already slides through so well.  But if I must, I bevel / sharpen the underside of the blade with a file.

The easiest way to get your new shovel shiny and smooth is to lend it to a young labourer who will be shoveling gravel at a work site for the next week.

Once we were sitting in a small park in Sidney, on Vancouver Island eating our lunch and an office ‘kid’ came out with a short-handled spade and started attacking the weeds near the office’s sidewalk.  I guess the boss told him to look after the verge.  He was all bent over and swinging wildly in a circular motion, like a windmill and smashing the blade into the soil with his arms and hands, bam, bam, bam, bam. He was totally exhausted in two minutes.  Obviously, he’d never used a shovel before.  Perhaps he was imitating a rototiller?

The goal is to use your feet as much as possible.  Whether you jump on the blade or stomp on it or gently stand on it is up to you and the blade but you only use your arms for pulling back on the handle or moving the soil.  I prefer work boots for that but when my Lovely Wife occasionally uses her shovel in her flower beds she tends to wear her flip flops.  Maybe they’re easier to clean?

 Happy Gardening.